Carving represents one of skiing's most satisfying techniques—clean, powerful turns where your edges slice through snow rather than skidding. Mastering carving transforms your skiing, providing better control, increased speed management, and significantly more enjoyment.
WHAT IS CARVING?
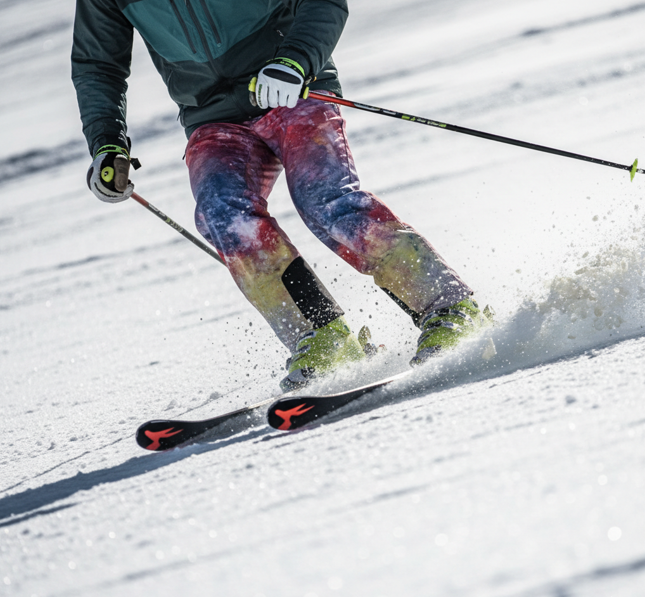
True carving occurs when your skis' edges cut through snow, creating clean, narrow tracks rather than wide, skidded paths. The ski follows its sidecut radius naturally, requiring minimal steering input.
PREREQUISITES FOR CARVING
Before attempting carving, you should comfortably:
- Ski parallel on blue runs
- Control speed through turns
- Balance on one ski
- Link turns smoothly
BODY POSITION FUNDAMENTALS
Proper Setup: Start with athletic stance—knees and ankles flexed, shoulders facing downhill, hands forward, weight centered over skis.
Edge Angle: Carving requires tipping skis on edge. The steeper the slope or tighter the turn, the higher the edge angle needed.
Forward Pressure: Maintain slight forward pressure on ski boots throughout the turn—this keeps you balanced over your edges.
THE CARVING MOTION
1. Turn Initiation: Begin by rolling ankles and knees toward the new turn direction. Let skis tip on edge naturally.
2. Building the Arc: As skis engage edges, allow your body to angle inside the turn arc. Your skis should feel like they're carving a railroad track.
3. Pressure Control: Increase pressure gradually through the turn middle, reaching maximum at the apex.
4. Turn Completion: Maintain edge engagement through turn completion, then smoothly transition to the new turn.
COMMON CARVING MISTAKES
Rotating the Upper Body: Keep shoulders facing downhill. Rotation causes skidding rather than carving.
Inadequate Edging: Carving requires commitment—tip your skis decisively on edge.
Leaning Back: Weight too far back causes skis to skid. Stay forward.
Fear of Speed: Carving generates speed. Start on moderate slopes until comfortable with the sensation.
PRACTICE PROGRESSION
Step 1—Gentle Carves: On easy blue runs, practice large-radius turns focusing on clean edge engagement.
Step 2—Railroad Tracks: Look back at your tracks—they should be two thin lines, not wide skid marks.
Step 3—Shorter Radius: Gradually tighten turn radius while maintaining carved edges.
Step 4—Steeper Terrain: Progress to steeper blues, then blacks, always maintaining carved rather than skidded turns.
EQUIPMENT CONSIDERATIONS
Modern shaped skis make carving easier than ever. However, dull edges prevent effective carving—keep edges sharp and properly tuned.
ADVANCED TECHNIQUES
Dynamic Carving: Increase edge angles dramatically, allowing your body to tip significantly inside the turn. This creates extremely powerful carved arcs.
Carved Short Turns: Quick edge-to-edge transitions while maintaining carved edges requires excellent balance and timing.
WHEN TO CARVE
Carving works best on:
- Groomed runs
- Moderate to steep slopes
- Hardpack or firm snow
Avoid attempting pure carving in:
- Deep powder
- Heavy crud
- Icy conditions where edge hold is uncertain
PRACTICE DRILLS
One-Ski Carving: Practice turns on one ski to develop edge awareness and balance.
Hands Forward: Ski with poles pointing forward to prevent upper body rotation.
Look Back: Regularly check your tracks to confirm clean carving versus skidding.
Remember, carving mastery takes practice. Start on comfortable terrain, focus on clean edge engagement, and gradually progress. The feeling of perfectly carved turns makes the practice worthwhile—it's skiing at its finest.
WHAT IS CARVING?
True carving occurs when your skis' edges cut through snow, creating clean, narrow tracks rather than wide, skidded paths. The ski follows its sidecut radius naturally, requiring minimal steering input.
PREREQUISITES FOR CARVING
Before attempting carving, you should comfortably:
- Ski parallel on blue runs
- Control speed through turns
- Balance on one ski
- Link turns smoothly
BODY POSITION FUNDAMENTALS
Proper Setup: Start with athletic stance—knees and ankles flexed, shoulders facing downhill, hands forward, weight centered over skis.
Edge Angle: Carving requires tipping skis on edge. The steeper the slope or tighter the turn, the higher the edge angle needed.
Forward Pressure: Maintain slight forward pressure on ski boots throughout the turn—this keeps you balanced over your edges.
THE CARVING MOTION
1. Turn Initiation: Begin by rolling ankles and knees toward the new turn direction. Let skis tip on edge naturally.
2. Building the Arc: As skis engage edges, allow your body to angle inside the turn arc. Your skis should feel like they're carving a railroad track.
3. Pressure Control: Increase pressure gradually through the turn middle, reaching maximum at the apex.
4. Turn Completion: Maintain edge engagement through turn completion, then smoothly transition to the new turn.
COMMON CARVING MISTAKES
Rotating the Upper Body: Keep shoulders facing downhill. Rotation causes skidding rather than carving.
Inadequate Edging: Carving requires commitment—tip your skis decisively on edge.
Leaning Back: Weight too far back causes skis to skid. Stay forward.
Fear of Speed: Carving generates speed. Start on moderate slopes until comfortable with the sensation.
PRACTICE PROGRESSION
Step 1—Gentle Carves: On easy blue runs, practice large-radius turns focusing on clean edge engagement.
Step 2—Railroad Tracks: Look back at your tracks—they should be two thin lines, not wide skid marks.
Step 3—Shorter Radius: Gradually tighten turn radius while maintaining carved edges.
Step 4—Steeper Terrain: Progress to steeper blues, then blacks, always maintaining carved rather than skidded turns.
EQUIPMENT CONSIDERATIONS
Modern shaped skis make carving easier than ever. However, dull edges prevent effective carving—keep edges sharp and properly tuned.
ADVANCED TECHNIQUES
Dynamic Carving: Increase edge angles dramatically, allowing your body to tip significantly inside the turn. This creates extremely powerful carved arcs.
Carved Short Turns: Quick edge-to-edge transitions while maintaining carved edges requires excellent balance and timing.
WHEN TO CARVE
Carving works best on:
- Groomed runs
- Moderate to steep slopes
- Hardpack or firm snow
Avoid attempting pure carving in:
- Deep powder
- Heavy crud
- Icy conditions where edge hold is uncertain
PRACTICE DRILLS
One-Ski Carving: Practice turns on one ski to develop edge awareness and balance.
Hands Forward: Ski with poles pointing forward to prevent upper body rotation.
Look Back: Regularly check your tracks to confirm clean carving versus skidding.
Remember, carving mastery takes practice. Start on comfortable terrain, focus on clean edge engagement, and gradually progress. The feeling of perfectly carved turns makes the practice worthwhile—it's skiing at its finest.
Ready to Hit the Slopes?
Visit Arizona Snowbowl for an unforgettable skiing experience
[Affiliate Link Placeholder - Book Your Trip]